Compensating for a Mediocre Scanner
NOTE: THE METHOD IN THIS POST IS FAULTY AND I NO LONGER RECOMMEND IT. I RECOMMEND THIS METHOD INSTEAD. I AM SORRY FOR LEADING YOU ASTRAY.
I may dream about Norris Hall's glorious large format flatbed scanner, but there's no way I can afford it on my not-even-breaking-even budget. Instead, I have to make due and be thankful for my Brother 6490CW, which is mediocre at everything it does, but scans slightly larger than 11x17 and prints on Bristol. When I first started in SEQA, I did not know ANY tricks to improve my ugly scans, and I was too stubborn to stand in line to scan on Norris's beautiful machine. Now that I'm slightly older and slightly wiser, I know how to purnty up those ugly scans, although I must admit, I vastly prefer Norris's superior tech scanner. Let me share with you, the reader at home with the three in one scanner printer copier coffee maker, how to make those ugly scans sparkle.
You shall need Photoshop. Or potatoshop, if you'd rather.
The image I'm starting with:
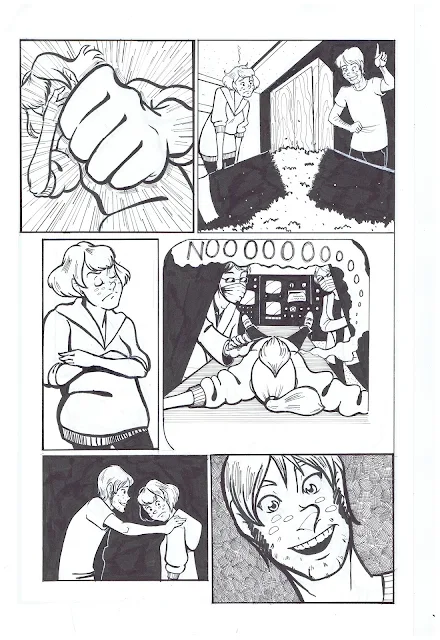 How convienant! It's today's page! Maybe I was just looking to show off my progress!
It's awfully grey, isnt it? Even without my scanner being mediocre at scanning, the real image is fairly grey. That's ok, I know how to compensate.
First you're going to need to crop the image.


The DPI is too low. I try to always work at 300 DPI, especially if I'm going to print it later.

Now you're ready to start your correcting! I have tow fairly easy tricks to try and correct my images. First, I go to the channels tab in the Layers box, and drop the green and the blue channels.

That drops SOME of the bluelines underneith. Since my scanner isn't that great, it has a hard time dropping those blues, so I'm going to have to do a little tweaking. On a nicer scanner, this probably wouldn't be an issue.
There are several ways you can correct problems like this. Now that I've dropped the green and the blue channels, my bluelines are grey.
 Some people use Threshold to drop those grays, and while it DOES drop the grays, it's pretty ugly.
 You can play around with the Color Balance,but believe me, it will catch up with you and colorize your image.
 I played with the Black and White, (Image-Adjustments-Black and White), and by the time I dropped the Cyan, the bluelines were gone.
Now, to fix the greyness of the scan. This is pretty easy. First, convert it to grayscale (Image-Mode-Grayscale), then copy your background layer.

Now set the layer mode to Multiply for the top layer.

Much blacker now. What happens if we copy that multiplied layer?
 We start to lose a little fidelity in our white lines. This is when I toggle the opacity in the topmost layer to find a balance I can live with.

Unfortunately, there is still some fuzzy grayness in the background. There are two ways to handle this. 1. USE A BETTER SCANNER, or 2. SELECT AND DELETE. You can do select and delete at two different times. 1. When you first start out and your bluelines are still blue and not grey. This works better as there's less chance that your black will be disrupted. 2. You can do what I'm about to do, and do it now. Go ahead and use the magic wand tool to select all those horrible gray spots and delete em. You're going to want to merge all your layers together, and you're going to want a white layer underneith those merged layers, otherwise all your deletion is for naught.

 If you like, you can just delete ALL of your original paper white.
 With the white layer back on...
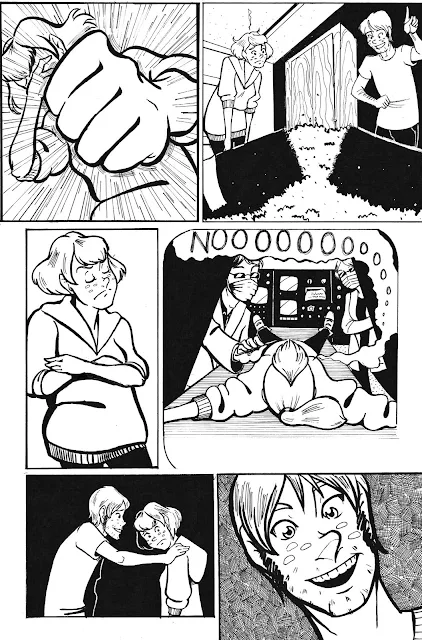 Ahh, the finished page.
If you're like me and you have a tablet, you can nitpick, noodle and correct ad nauseating. I mean seriously, look at that arm on the second tier. WHAT WAS I THINKING?!
So you're smart and you've noticed that the image quality is still pretty low. My scanner's native scan setting is for 200 DPI, and my scanner and my computer are no longer on speaking terms. Picasa and Photoshop both pretend they've never heard of my scanner, so I have to rely on the native Windows software, which doesn't allow me to tweak. This is why I've resolved not to scan important things at home anymore. That and the color fidelity is horrible.
Anyway, I hope this has made dealing with your three in one a little less painful.
I may dream about Norris Hall's glorious large format flatbed scanner, but there's no way I can afford it on my not-even-breaking-even budget. Instead, I have to make due and be thankful for my Brother 6490CW, which is mediocre at everything it does, but scans slightly larger than 11x17 and prints on Bristol. When I first started in SEQA, I did not know ANY tricks to improve my ugly scans, and I was too stubborn to stand in line to scan on Norris's beautiful machine. Now that I'm slightly older and slightly wiser, I know how to purnty up those ugly scans, although I must admit, I vastly prefer Norris's superior tech scanner. Let me share with you, the reader at home with the three in one scanner printer copier coffee maker, how to make those ugly scans sparkle.
You shall need Photoshop. Or potatoshop, if you'd rather.
The image I'm starting with:

It's awfully grey, isnt it? Even without my scanner being mediocre at scanning, the real image is fairly grey. That's ok, I know how to compensate.
First you're going to need to crop the image.


The DPI is too low. I try to always work at 300 DPI, especially if I'm going to print it later.

Now you're ready to start your correcting! I have tow fairly easy tricks to try and correct my images. First, I go to the channels tab in the Layers box, and drop the green and the blue channels.

That drops SOME of the bluelines underneith. Since my scanner isn't that great, it has a hard time dropping those blues, so I'm going to have to do a little tweaking. On a nicer scanner, this probably wouldn't be an issue.
There are several ways you can correct problems like this. Now that I've dropped the green and the blue channels, my bluelines are grey.


Now, to fix the greyness of the scan. This is pretty easy. First, convert it to grayscale (Image-Mode-Grayscale), then copy your background layer.

Now set the layer mode to Multiply for the top layer.

Much blacker now. What happens if we copy that multiplied layer?


Unfortunately, there is still some fuzzy grayness in the background. There are two ways to handle this. 1. USE A BETTER SCANNER, or 2. SELECT AND DELETE. You can do select and delete at two different times. 1. When you first start out and your bluelines are still blue and not grey. This works better as there's less chance that your black will be disrupted. 2. You can do what I'm about to do, and do it now. Go ahead and use the magic wand tool to select all those horrible gray spots and delete em. You're going to want to merge all your layers together, and you're going to want a white layer underneith those merged layers, otherwise all your deletion is for naught.


If you're like me and you have a tablet, you can nitpick, noodle and correct ad nauseating. I mean seriously, look at that arm on the second tier. WHAT WAS I THINKING?!
So you're smart and you've noticed that the image quality is still pretty low. My scanner's native scan setting is for 200 DPI, and my scanner and my computer are no longer on speaking terms. Picasa and Photoshop both pretend they've never heard of my scanner, so I have to rely on the native Windows software, which doesn't allow me to tweak. This is why I've resolved not to scan important things at home anymore. That and the color fidelity is horrible.
Anyway, I hope this has made dealing with your three in one a little less painful.


Comments
Post a Comment