Watercolor Brush Pen Review: Docrafts Artiste Watercolor Markers
Edit: Last year it was alcohol based markers, this year it's all about water and watercolor markers. If you enjoyed this post, please consider checking out my other art supply reviews in my Reviews tab above. If you would like to purchase a set of DoCrafts watercolor markers for yourself or a friend, please consider supporting this blog financially by using my Amazon affiliate link for DoCrafts markers.
As this blog is completely unsponsored, and I receive no financial compensation from companies to write these reviews, nor do I receive donations from manufacturers, I really depend on the goodwill of my readers. If you benefitted from this post, please consider contacting Docrafts with a link to this post and your thoughts. I would also sincerely appreciate it if you sent me an email with your thoughts, questions, or thanks.
I've mentioned on this blog in the past that I love to be proved wrong. I am a bit of a pessimist by nature, but I'm a fool of a pessimist, because I'm always optimistically hoping that the best will happen, and that I predicted the situation incorrectly. I really like when this happens with conventions and art supplies- when my pessimism is kicked right out the door, and I start to believe the best in people (and art supplies).
Let's be honest here. The brand Docrafts with the subset of Artiste doesn't inspire a lot of hope when it comes to legitimate art supplies. At least, it didn't really inspire a lot of hope in me, when I saw the listing on Amazon for their watercolor dual tip markers. And you know what? If I'd actually been in the market to buy JUST ONE brand of watercolor markers, I probably would've stopped at Akashiya Sai, thrown in the towel, and stomped out the watercolor marker door. But this blog does art reviews, so it's easy for me to justify testing out new products, especially when I plan on sharing with you guys. And at $39.99 for 36 markers, it was just the sort of deal with the devil (too cheap to be good, too cheap to pass up) that I have trouble resisting. Unfortunately for you guys, that listing is gone (for now), but you can try out a 12 pack of Docrafts Artiste watercolor markers $20.49.
The Packaging
My Docrafts Artiste Watercolor Markers arrived organized in a storage easel that was packaged in a clear plastic box. The box was pretty easy to open.
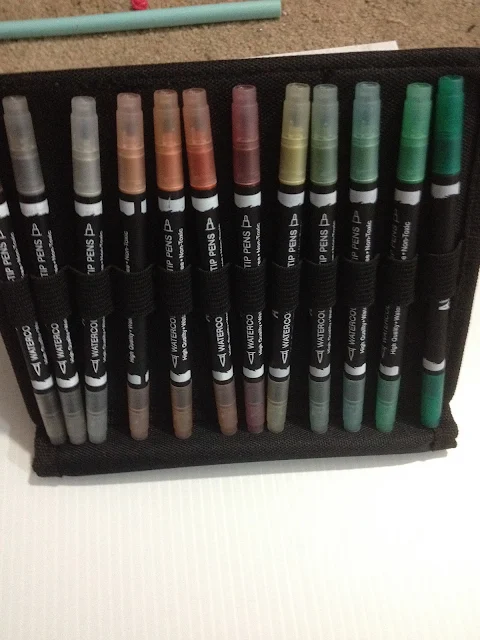
The Docrafts Artiste Watercolor Markers come in their own foldable easel, which can be folded into a triangle, or spread out open. The individual markers arrived sorted by color, and are held in place by elastic. I figure if I dislike how these perform, I can always salvage the case for other uses.
The Pens
So I am torn- these markers look REALLY cool, and the case is actually very neat, but at $39.99 it definitely seems way too good to be true for 36 watercolor markers. I've never seen this brand in stores before, but that doesn't necessarily mean much- these could be European, Korean, or Chinese and I wouldn't necessarily be familiar with the brand. When I first found out about Shin Han Twin Touches, they were ridiculously cheap, and I was very impressed with their quality given the price. The low price was mainly because they were so unknown that I was able to get them on a deep sale, but now that they're becoming more popular, they've risen in price.
The markers don't have color names marked on the barrels, and with 36 colors, it may be very easy to lose track of which color is exactly which. While the caps are fairly close to the color in most instances, it would be nice to have uses marked off on the black case, something I may do in the future. These 'markers' are also very thin and fairly small, so really more like brushpens than like markers, which I tend to think of as being chunky in the hand to hold all that ink. These markers are also not refillable, and feature a matte finish on the barrel that feels pretty decent in the hand. There's nothing but the portfolio style case they came in to keep them from rolling off your desk, so keep that in mind when using these markers.
I'm worried though- I'm so excited about these markers that they're bound to disappoint, right? This is going to be another Akashiya Sai situation. The exception is that I'd had experience using and liking Akashiya's But docrafts claims that they are 'connoisseurs of colour', so how can I go wrong, right?
This
The brushnib is the weirdest brushnib I've seen yet, but that doesn't reaally mean a whole lot. The other side is your standard bullet nib- I'd really love to encounter a GOOD watercolor brushpen/marker that has a fude nib instead of a bullet nib, and a super brush for the brush nib, but this isn't that marker, so my search must continue.
The Field Test
Swatching
The bullet nib isn't really noteworthy, but the brush tip is actually flexible and pretty decent, sort of like a weird, long fude nib. The small fude-esque nib probably makes it harder to cover large surfaces with color.
My initial swatches were made by applying the ink, then quickly going over the ink with a wet brush. With the swatches, only one or two colors SORTA separated into individual pigments- if you looked really closely, you could see the colors start to break down (the black, two of the purples), but it's not nearly as bad as the Akashiya Sai watercolor brushpens separated. It honestly doesn't really bother me all that much right now, but future testing may prove it to be unbearable, and I'll have to amend this post to note that. While the colors go down saturated, the color quickly fades out as you add water, but that's also the issue of going from saturated pigment to watered down pigment.
Unlike MANY of the other watercolor markers I've used (actually almost all), Docrafts Artiste watercolor markers can be blended even if allowed to dry. Regardless of drying time, initial application of pigment will still be the darkest area of pigment, so take this into account.
You can use the side masking tape palette to also mix colors by applying one on top of the other before adding water. I did this to mix the skin shadows for the field test illustration- usually I apply shadows last, but I thought it might be easier to handle if I applied the red violet skin shadows first. These markers don't have color names, so I can't list them, but I mixed a hot magentaish pink with a reddish purple.
Keep in mind that the inks reactivate when you apply additional layers of color, which may make them difficult to work with if you're like me, and apply A LOT of layers to build up color.
In Practice
Recently I put the Winsor & Newton Watercolor Markers through their paces on watercolor paper, and I made a mini palette to pull from using masking tape applied to the side of my gatorboard support. I used this technique for the Docrafts Artiste Watercolor markers as well.
The swatches I made in my swatchbook really come in handy when actually painting, because the caps on the markers, while really cute, are too translucent to really be color accurate, and the colors do change slightly when water is applied and brushed out.
I set up a mini palette using masking tape on the side, so I had the option of applying color directly, or mixing and diluting it first.
I also applied some preliminary shadows to Kara and her dress.
Once my first layer dried, I applied additional layers of violet.
After the violet had dried, I started applying shadows to Kara's dress using a light blue diluted on my side palette.
After the blue was dry, I started applying skintones, again using the side palette.
And I started blocking in the yellows on the dress.
I was a little frustrated by how light the skintones were laying down when applied using the palette, so I also started applying them directly to Kara's face using the Japanese Brush (the bullet is too stiff, and will tear up the paper), and softening and blending the lines using a wet round brush.
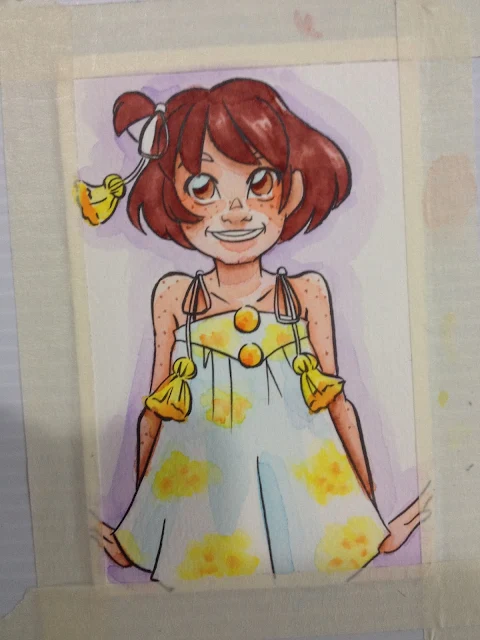
The end result, carefully applied, worked out well.
I also applied blush using a light pink- both applied to the palette and mixed with water, and also applied directly to Kara's cheeks and blended out. Because these markers are pigment based, you need to let everything dry very thoroughly before you add additional water, or it'll bleed into that area.
As you can see, some of the skintone started bleeding into the hair. I knew this wouldn't be much of an issue, though, as Kara has such dark hair, it'd cover the mistake.
I applied the hair color directly to the paper using the Japanese nib.
I was surprised by how much I liked using these watercolor markers and how well they handled, given the price tag. Honestly, I would probably reach for these again happily (and probably will do so)- they're easier to use than the Tombow ABT markers (review coming soon), and cheaper than Neopiko 4's.
The Verdict
While these markers are made for, and really marketed to crafters, they aren't bad watercolor markers by a long shot. They're cheaper than Neopiko 4 markers, take water application better than Akashiya Sai watercolor brush pens, but may be harder to find than Winsor Newton watercolor markers, which are becoming pretty common in art supply stores. You just need to make sure everything is dry before applying subsequent layers, otherwise the dye based color will bleed a lot.
As this blog is completely unsponsored, and I receive no financial compensation from companies to write these reviews, nor do I receive donations from manufacturers, I really depend on the goodwill of my readers. If you benefitted from this post, please consider contacting Docrafts with a link to this post and your thoughts. I would also sincerely appreciate it if you sent me an email with your thoughts, questions, or thanks.
I've mentioned on this blog in the past that I love to be proved wrong. I am a bit of a pessimist by nature, but I'm a fool of a pessimist, because I'm always optimistically hoping that the best will happen, and that I predicted the situation incorrectly. I really like when this happens with conventions and art supplies- when my pessimism is kicked right out the door, and I start to believe the best in people (and art supplies).
Let's be honest here. The brand Docrafts with the subset of Artiste doesn't inspire a lot of hope when it comes to legitimate art supplies. At least, it didn't really inspire a lot of hope in me, when I saw the listing on Amazon for their watercolor dual tip markers. And you know what? If I'd actually been in the market to buy JUST ONE brand of watercolor markers, I probably would've stopped at Akashiya Sai, thrown in the towel, and stomped out the watercolor marker door. But this blog does art reviews, so it's easy for me to justify testing out new products, especially when I plan on sharing with you guys. And at $39.99 for 36 markers, it was just the sort of deal with the devil (too cheap to be good, too cheap to pass up) that I have trouble resisting. Unfortunately for you guys, that listing is gone (for now), but you can try out a 12 pack of Docrafts Artiste watercolor markers $20.49.
The Packaging
My Docrafts Artiste Watercolor Markers arrived organized in a storage easel that was packaged in a clear plastic box. The box was pretty easy to open.
The Docrafts Artiste Watercolor Markers come in their own foldable easel, which can be folded into a triangle, or spread out open. The individual markers arrived sorted by color, and are held in place by elastic. I figure if I dislike how these perform, I can always salvage the case for other uses.
The Pens
So I am torn- these markers look REALLY cool, and the case is actually very neat, but at $39.99 it definitely seems way too good to be true for 36 watercolor markers. I've never seen this brand in stores before, but that doesn't necessarily mean much- these could be European, Korean, or Chinese and I wouldn't necessarily be familiar with the brand. When I first found out about Shin Han Twin Touches, they were ridiculously cheap, and I was very impressed with their quality given the price. The low price was mainly because they were so unknown that I was able to get them on a deep sale, but now that they're becoming more popular, they've risen in price.
The markers don't have color names marked on the barrels, and with 36 colors, it may be very easy to lose track of which color is exactly which. While the caps are fairly close to the color in most instances, it would be nice to have uses marked off on the black case, something I may do in the future. These 'markers' are also very thin and fairly small, so really more like brushpens than like markers, which I tend to think of as being chunky in the hand to hold all that ink. These markers are also not refillable, and feature a matte finish on the barrel that feels pretty decent in the hand. There's nothing but the portfolio style case they came in to keep them from rolling off your desk, so keep that in mind when using these markers.
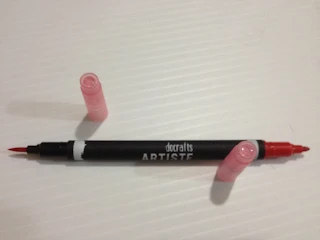 |
| To left: Japanese Brush Nib. To Right: Bullet Nib |
I'm worried though- I'm so excited about these markers that they're bound to disappoint, right? This is going to be another Akashiya Sai situation. The exception is that I'd had experience using and liking Akashiya's But docrafts claims that they are 'connoisseurs of colour', so how can I go wrong, right?
 |
| The Japanese Brushnib |
The brushnib is the weirdest brushnib I've seen yet, but that doesn't reaally mean a whole lot. The other side is your standard bullet nib- I'd really love to encounter a GOOD watercolor brushpen/marker that has a fude nib instead of a bullet nib, and a super brush for the brush nib, but this isn't that marker, so my search must continue.
The Field Test
Swatching
The bullet nib isn't really noteworthy, but the brush tip is actually flexible and pretty decent, sort of like a weird, long fude nib. The small fude-esque nib probably makes it harder to cover large surfaces with color.
My initial swatches were made by applying the ink, then quickly going over the ink with a wet brush. With the swatches, only one or two colors SORTA separated into individual pigments- if you looked really closely, you could see the colors start to break down (the black, two of the purples), but it's not nearly as bad as the Akashiya Sai watercolor brushpens separated. It honestly doesn't really bother me all that much right now, but future testing may prove it to be unbearable, and I'll have to amend this post to note that. While the colors go down saturated, the color quickly fades out as you add water, but that's also the issue of going from saturated pigment to watered down pigment.
Unlike MANY of the other watercolor markers I've used (actually almost all), Docrafts Artiste watercolor markers can be blended even if allowed to dry. Regardless of drying time, initial application of pigment will still be the darkest area of pigment, so take this into account.
You can use the side masking tape palette to also mix colors by applying one on top of the other before adding water. I did this to mix the skin shadows for the field test illustration- usually I apply shadows last, but I thought it might be easier to handle if I applied the red violet skin shadows first. These markers don't have color names, so I can't list them, but I mixed a hot magentaish pink with a reddish purple.
Keep in mind that the inks reactivate when you apply additional layers of color, which may make them difficult to work with if you're like me, and apply A LOT of layers to build up color.
In Practice
Recently I put the Winsor & Newton Watercolor Markers through their paces on watercolor paper, and I made a mini palette to pull from using masking tape applied to the side of my gatorboard support. I used this technique for the Docrafts Artiste Watercolor markers as well.
The swatches I made in my swatchbook really come in handy when actually painting, because the caps on the markers, while really cute, are too translucent to really be color accurate, and the colors do change slightly when water is applied and brushed out.
I set up a mini palette using masking tape on the side, so I had the option of applying color directly, or mixing and diluting it first.
I opted to apply the background first: A nice violet to contrast with the yellow I planned on using for the dress. I applied the color using the bullet nib on the masking tape, and then used a wet brush to mix the color and apply it to the paper.
I also applied some preliminary shadows to Kara and her dress.
Once my first layer dried, I applied additional layers of violet.
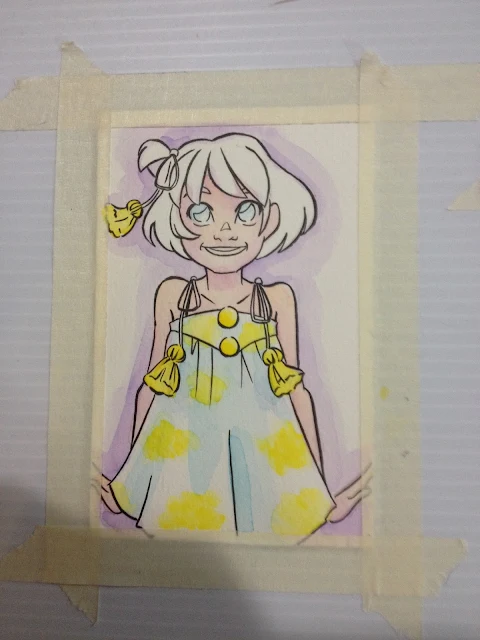
After the violet had dried, I started applying shadows to Kara's dress using a light blue diluted on my side palette.
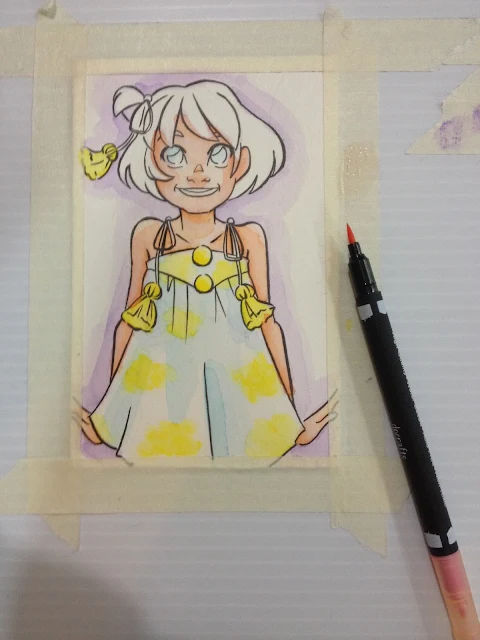
After the blue was dry, I started applying skintones, again using the side palette.
And I started blocking in the yellows on the dress.
I was a little frustrated by how light the skintones were laying down when applied using the palette, so I also started applying them directly to Kara's face using the Japanese Brush (the bullet is too stiff, and will tear up the paper), and softening and blending the lines using a wet round brush.
The end result, carefully applied, worked out well.
I also applied blush using a light pink- both applied to the palette and mixed with water, and also applied directly to Kara's cheeks and blended out. Because these markers are pigment based, you need to let everything dry very thoroughly before you add additional water, or it'll bleed into that area.
As you can see, some of the skintone started bleeding into the hair. I knew this wouldn't be much of an issue, though, as Kara has such dark hair, it'd cover the mistake.
I applied the hair color directly to the paper using the Japanese nib.
I was surprised by how much I liked using these watercolor markers and how well they handled, given the price tag. Honestly, I would probably reach for these again happily (and probably will do so)- they're easier to use than the Tombow ABT markers (review coming soon), and cheaper than Neopiko 4's.
The Verdict
While these markers are made for, and really marketed to crafters, they aren't bad watercolor markers by a long shot. They're cheaper than Neopiko 4 markers, take water application better than Akashiya Sai watercolor brush pens, but may be harder to find than Winsor Newton watercolor markers, which are becoming pretty common in art supply stores. You just need to make sure everything is dry before applying subsequent layers, otherwise the dye based color will bleed a lot.










Comments
Post a Comment