Experiments and Mistakes: Masking For Marker Airbrushing
Let’s say, you have a ton of markers, the Copic Airbrush System (ABS), and haven’t really experimented too much with masking.
Becca has demonstrated masking techniques in the past for use with alcohol inks, but I’ll cover two different processes I’ve used in creating illustrations using the Copic ABS.

Supplies I used:
Illustration(s) on suitable paper
Scrap Paper
Nib or Brush to apply masking fluid- I used the Incredible Nib
Masking fluid/Liquid Frisket- I used Pebeo
Copic ABS + Air Can
Copic Markers
X-Acto Knife (not pictured)
Scissors (not pictured)
Tape (optional and not pictured)- any type is fine, I used Scotch
Screentone (not pictured)- I used this one
What constitutes “suitable paper”?
This is gonna depend greatly on the type of mask you’re doing. Deleter’s manga paper (or Kent Paper) won’t work well with the Frisket Film I’ve got (it tears, as you’ll see). It also doesn’t take wet media super well, so liquid frisket won’t do. I’d honestly recommend using something that’s NOT super smooth. The paper that worked best in this demonstration was inexpensive watercolor paper with some tooth. You can also use Bristol board, but you may have some issues with tearing.
So, what’s the Copic ABS?
The Copic Airbrush System is a useful system for airbrushing using Copic Markers. I personally have the ABS-1N setup, which I got secondhand. I usually buy the 180 Air Cans.
You can find an overview on Imagination International’s website:
Illustration 1
I started off with the doodle on Watercolor paper. (Stonehenge Aqua - Cold Press)
Because this is a small doodle and I don’t need to cover a lot of surface area, I’m going to use the masking fluid + a paper mask.
The paper mask does a couple of things for me:
- Prevents missing areas with masking fluid, resulting in weird spots where your ink might bleed through.
- Prevents me from tearing the paper with poor masking fluid applications.
Don’t use a paper mask with wet media.
Before you start: Maybe don’t do the things I did, and trace out something that’s roughly sized to the area you’ll be masking. It does NOT need to be precise.
Step 1: On the INSIDE of your mask area, take your nib/brush and line it with the masking fluid.

Step 2: Don’t be me. You should already rooooooughly have an idea of how large you’re going to mask (either use a lightbox, or just sketch it out). I realized this after applying the masking fluid, so I decided to fudge it.
It didn’t fit.


Step 3: Trim and make your paper mask fit. If it’s not an exact fit, this is why scrap paper is great. You can stick it together using tape or masking fluid.
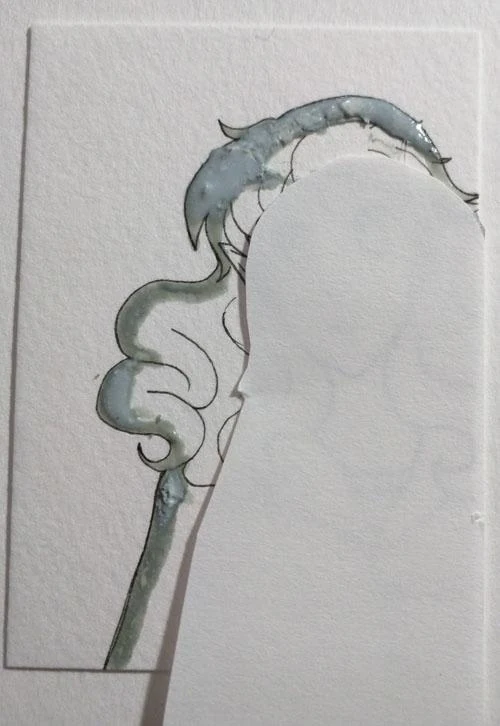

Step 4: Close up holes around the edges and let it dry. At this point, I usually apply masking fluid to make sure everything’s okay around the edges.

And now we let it dry a bit…
Step 5: When it’s dry, let’s get started with our masking! I chose to use one of my smaller doilies, from one of my many explorations of the local craft store. If you can find a stencil or design made out of a paper that’s not super thin or likely to be damaged by moisture, you can reuse them for ages.


I taped the doily down in this instance, and opted to move my illustration freely within the masked area to mask another design. At the top of the illustration, I used a darker blue.

Step 6: Additional airbrushing is done at this point. I sometimes like to layer other colors on top. This will help blur the original stencil effect AND add additional color.

Step 7: Remove the mask! ...Carefully. Don’t worry if your paper mask tears as you’re removing it. Also take care when removing the masking fluid, as marker ink on top of it may smudge slightly. (If you can peel it off, all the better.)
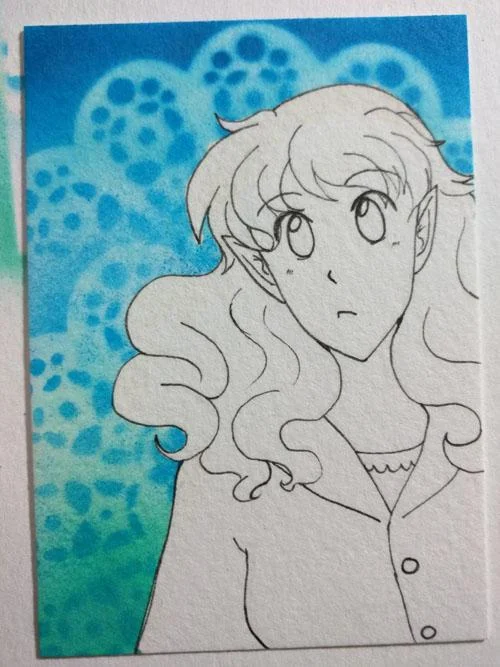
Illustration 2
This did not go smoothly at all. The actual drawing portion of things went well enough -- I have an easy time of working on the super smooth Deleter Comic Paper, but Frisket paper doesn’t seem to like it.
(I did test later on another sheet of Deleter Comic Paper -- it’s true. DO NOT use frisket paper on this.)


Typically, when working with Frisket paper, you need to figure out about how much you use, and cut out something approximate to that area. Then, you remove it from its backing and place it on the paper to trim…

As you see, though, the paper tore as I was peeling my trimmed area. So… I had to start again.
Much swearing was had. I’d almost decided to give up, because I really have found that I don’t like Frisket fim for the amount of effort I have to put in. Plus, I also need to make sure I’m working in good light conditions, otherwise I can barely see the crap on my paper. Maybe it’ll work better for some handmade spot gloss effects on illustrations in the future, but I’ve no idea if it will discolor.
Illustration 3
I decided in this instance, I was still going to work with the Deleter paper. I’m stubborn. BUT I was gonna change things up a bit this time. Instead of using actual frisket film, I’d use something a little… Unusual.
Screentone!
What’s that, you say? What’s screentone? If you missed my previous tutorial, then you might have SOME familiarity with them (at least digitally). If you want a primer, Loom’s Screentones overview is intensely helpful.

In this case, I had a sample sheet of Deleter SE-61 handy, from some previous orders to the Deleter Mangashop.
Screentones have an odd adhesive on the back -- they’re low tack, but adhere securely to the paper they’re on. If you have to remove them for some reason, they’re very unlikely to tear smooth papers.
Step 1: Cut out something vaguely shaped like your illustration from the tone. The backing paper of Screentones is generally only slightly opaque so you can see through them. Once you have it cut out, peel it off your backing paper, and adhere it to your illustration.

This actually makes a much easier mask to work with, in my opinion, since you can see the illustration underneath AND the areas you need to remove with ease.
Step 2: Trim your screentone from areas you don’t need it to be applied. Usually as I work, I’ll often gently lift it up using the tip of my knife so I can pull and cut from the toned area.


Once trimmed, you’ll have have something which is easy to remove, and is highly unlikely to leave a sticky residue (unless you leave it on the paper a few months…)
Step 3: Do your airbrushing.


In this particular case, I ran the Colorless Blender through the ABS, and used that to create the white spots. Some papers don’t do well with this. If done near your masked area they will wick any color under the mask and you’re gonna have cleanup to do. The Deleter paper really does seem to do a good job of it, though.
Step 4: Peel, and finish off your illustration!

Once all’s said and done and colored, I’ll probably post this illustration on deviantArt or something. ;3
Like what I do? You can find more of my artwork and resources online:
Website: shooting-stars.org
Webcomic: linkedcomic.com
deviantArt: kabocha.deviantart.com
Kabocha is a member of Ink Drop Cafe, a wonderful webcomic collective full of talented creators! Come sample our tasty menu of comics!


Comments
Post a Comment