Creating Stickers with Cricut for Fun and Profit
Hello again! I'm Kabocha, taking up your valuable time here on Becca's blog.
Let's say you're looking at doing a convention, and you need some inexpensive merch. You decide to make stickers, because that's fun and popular!
You don't want to ship it off to a third party manufacturer because then you have to really worry about shipping deadlines or print time, or their pricing if you have to reorder.
Sounds like you might want a die cutting machine! The initial cost is high, but once you have it, you're really only paying for replacement parts here and there!
Full disclosure: The only die cutter I've used is the Cricut Explore Air 2 - so I can't speak to how you would go about this process using a Silhouette or other machine.
First and foremost, you're gonna need some supplies to get started. I'm going to throw my personal recommendations at you. Feel free to change up things as you want.
Printer:
Canon Pixma TS6120
Paper:
Printable Sticker Paper
Laminate:
Duck Peel N' Stick Laminate
Die Cutter:
Cricut Explore Air 2
Other supplies:
So, you have all the things you need to make stickers? OK, good.
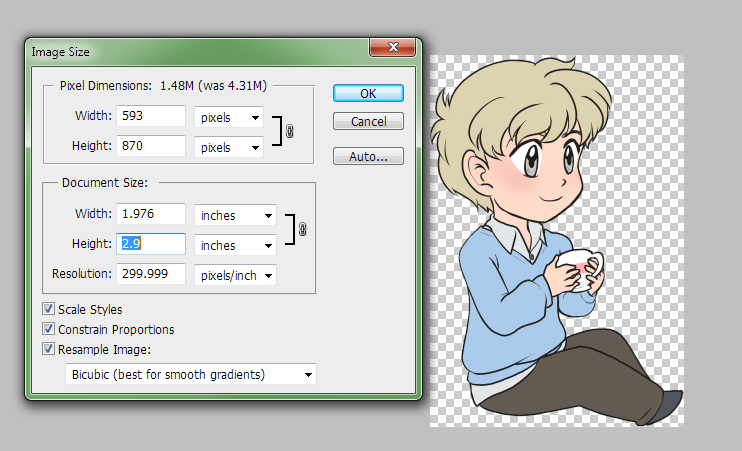
Let's say you have a super cute illustration ready, and it's been set up at the size you want. For stickers, I typically go no larger than 3 inches x 3 inches at 300DPI -- so that means the max dimensions should be 900px in both directions, including any borders you have on the edge of the image.
If my image file's a little larger - that's fine. I'll usually resize the largest side down to about 2.9 inches (~870px).
After that, I change the canvas size to add on extra space and add on a 25px white border to the image.
The white border is necessary to make sure the Cricut doesn't destroy my illustration when cutting.
Since I usually add the border as a layer effect, I then merge the layer with the border down onto an empty layer, and manually smooth out the white border for an easier cut.


You can see how the image was smoothed out.
I then crop the image to fit with its actual size and note what the dimensions are.
After this, I export the image with transparency so I can import it to the Design Space.
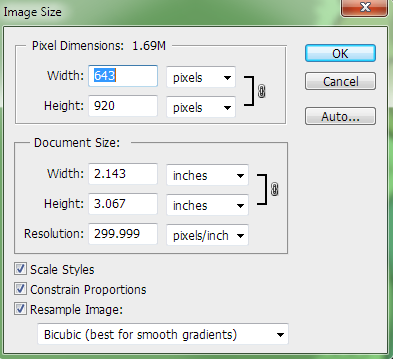
We know the actual dimensions will end up being a max height of 3.067 inches.
I am assuming your Cricut is connected to your computer, but that you have not used the Design Space. First-time users will be prompted to download the Cricut Bridge software.
When you get into the Design Space, open up a New Project.
Once a new project canvas is opened, click Upload to upload your file.
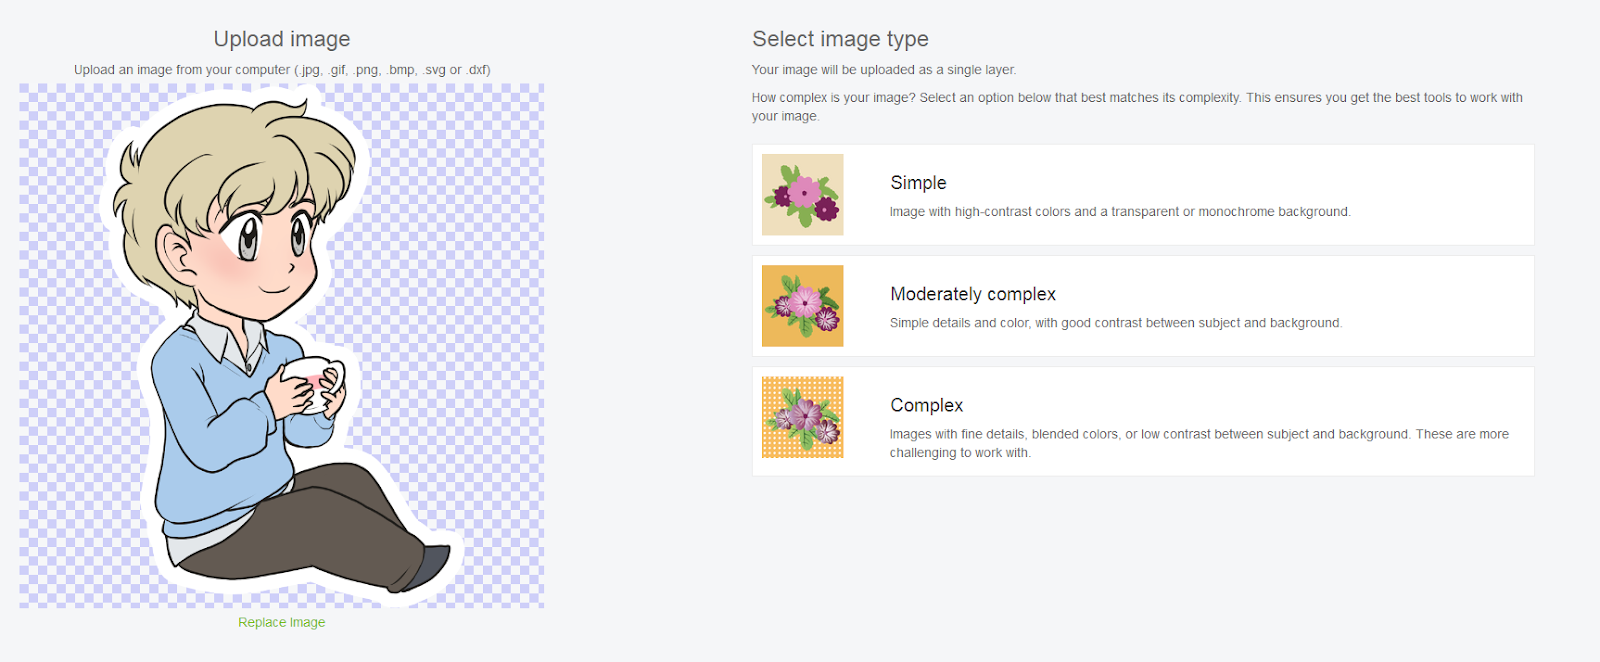
The upload screen is pretty straightforward -- you can upload your own images to use for free, which is exactly what we're doing.
When you upload your image, you'll be presented with a few options. For simplicity's sake, choose "Complex" and hit Continue.
Unless you made a mistake when exporting your image, you don't need to mess with Select & Erase.
Hit Continue again.
On the last screen, you'll have options as to what kind of image you'll be using, and what you want to name it.
Since you uploaded something you want to make into stickers, save this as a Print then Cut image. Consider adding some tags, too, just to save yourself trouble.

Once you've got that all done, hit Save.
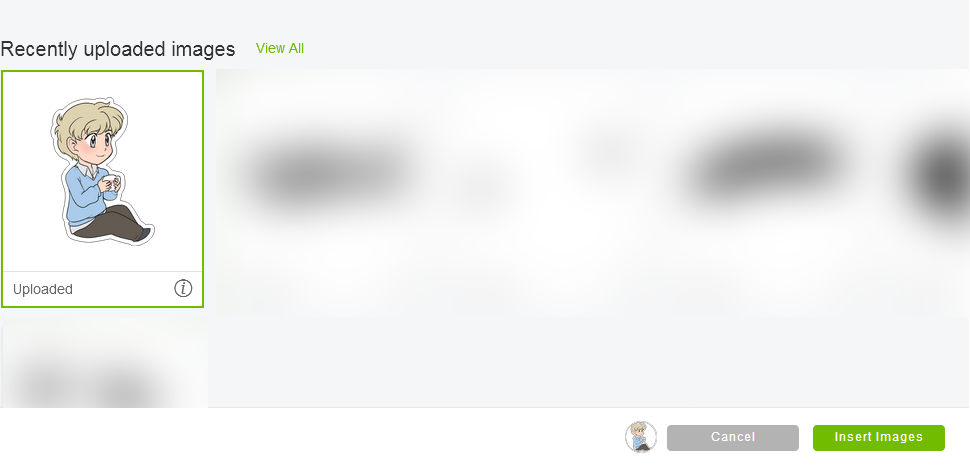
You'll be taken back to the upload screen, where you can insert your recently uploaded images.
Click on your desired sticker(s) to select it, and then click Insert Images.
Here's why we needed to know the dimensions of the sticker before.
The Cricut Design Space doesn't recognize that you might have set a specific resolution for your image.
This is mildly annoying, but workable.
Select your image on the canvas, and change the size to match what you expected it to be. (Otherwise, you're going to have some monstrously large images.)

If you're only doing one sticker, click Make It in the top right corner.
If you're adding other stickers, follow the same process to upload them. If you're going to do sheets of the same sticker, duplicate it.
From past experience, I know I can fit about six 3inch stickers on a sheet of 8.5 x 11 sticker paper -- sometimes I can fit as many as 9.
When you click Make It, you'll get a preview of your print output so you can decide if you want to fit more images on the same sheet of paper. Cricut ONLY handles 8.5 x 11 Print then cut projects, for reference.
The Design Space will automatically adjust your images for the best fit with the paper you've given it.
If it all looks good, hit "Continue" and load your paper into the printer.
When you send your file to the printer, you can adjust your settings using 'Advanced' (I suggest doing this) -- here's my settings for my Pixma.
Unfortunately, you'll need to do this EVERY TIME YOU PRINT. (Unless you set it as a default setting, but... ugh.)
Now that your images are printed, you'll need to apply the laminate. Notice how there's a black border around the space the images occupy -- this is the bounding box the Cricut uses to determine where to cut.
Figure out how wide and how tall that is -- you want your laminate to stay within these borders, but not overlap onto them.
Why? The Cricut scans these borders. If there's laminate on top of it, you may get an inaccurate cut due to the reflective nature of the material.

To keep it inside the borders, we'll cut a chunk of laminate approximately 7 inches wide by 8 3/4 inches tall.
Once I have my laminate cut, I start applying it by peeling a corner and placing it in a corner of my paper. Then, I very carefully peel, making sure to run my hand over the areas the laminate will now lay as I peel. This helps prevent bubbles. This video also goes over a similar process, burnishing while applying.
I typically lay the backing of the laminate over the area I just adhered it to, and run my scraper over the laminate after it's been applied to make sure everything is flat.
Once your laminate is applied, it's time to cut.
Finally.
Now that you're good to go, put your stickers in the top corner.

Typically, I set my dial for these stickers to Poster Board or Poster Board+.
Why? Because it applies the amount of pressure I need for die cut stickers. I don't have any desire to do KISS cut designs, so die cut works for me.
Follow the instructions in design space and load your mat and blade. Hit the "Go" button on your machine and let it do the magic.
Once you're done, unload your mat, remove your stickers (use your spatula if you so choose) and you're done!
After all this, bear in mind that every so often, you may need to clean your Cricut blade with a bit of vinegar to remove any adhesive residue.
If you liked this tutorial, check out the resources I have over at shooting-stars.org!
If you liked my art, maybe check out my comic at linkedcomic.com?
Let's say you're looking at doing a convention, and you need some inexpensive merch. You decide to make stickers, because that's fun and popular!
You don't want to ship it off to a third party manufacturer because then you have to really worry about shipping deadlines or print time, or their pricing if you have to reorder.
Sounds like you might want a die cutting machine! The initial cost is high, but once you have it, you're really only paying for replacement parts here and there!
Full disclosure: The only die cutter I've used is the Cricut Explore Air 2 - so I can't speak to how you would go about this process using a Silhouette or other machine.
Supplies
First and foremost, you're gonna need some supplies to get started. I'm going to throw my personal recommendations at you. Feel free to change up things as you want.
Printer:
Canon Pixma TS6120
I strongly suggest an inkjet printer. Toner printers are expensive, and their color accuracy isn't too great. The Pixma met my requirements for stickers and a variety of other things, without being an irritating device to maintain.
Paper:
Printable Sticker Paper
Don't buy the Cricut paper. It's overpriced for the quantity you get -- and the Online Labels paper is actually quite good!
Laminate:
Duck Peel N' Stick Laminate
Yes, I realize this is sold with shelf liner. It's acid free and should last a good while. It's easy to cut through! Alternatively, You can pick this up at Wal-Mart or someplace similar for under $6 with sales tax.
Other types of laminate (such as holographic) can sometimes be found at your local craft store, or online. I don't recommend buying through Alibaba unless you're ready to deal with that.
Other types of laminate (such as holographic) can sometimes be found at your local craft store, or online. I don't recommend buying through Alibaba unless you're ready to deal with that.
Die Cutter:
Cricut Explore Air 2
This is the expensive part. But lemme tell you, this thing is kind of nice. You'll want to get a few add-ons for it to make your life easier, though:
Spatula and Scraper
Spare Standard Grip Cutting Mat
Spare Fine-Point Blade
Spatula and Scraper
Spare Standard Grip Cutting Mat
Spare Fine-Point Blade
Other supplies:
- Scissors
- Guillotine Cutter (optional)
- White vinegar (for removing adhesive from blades)
- Photo editing software
Preparing your Files
So, you have all the things you need to make stickers? OK, good.
Let's say you have a super cute illustration ready, and it's been set up at the size you want. For stickers, I typically go no larger than 3 inches x 3 inches at 300DPI -- so that means the max dimensions should be 900px in both directions, including any borders you have on the edge of the image.
If my image file's a little larger - that's fine. I'll usually resize the largest side down to about 2.9 inches (~870px).
After that, I change the canvas size to add on extra space and add on a 25px white border to the image.
The white border is necessary to make sure the Cricut doesn't destroy my illustration when cutting.
Since I usually add the border as a layer effect, I then merge the layer with the border down onto an empty layer, and manually smooth out the white border for an easier cut.
You can see how the image was smoothed out.
I then crop the image to fit with its actual size and note what the dimensions are.
After this, I export the image with transparency so I can import it to the Design Space.
We know the actual dimensions will end up being a max height of 3.067 inches.
Preparing to Cut
The Cricut Design space is pretty simple. If you have a Cricut machine, you can use it at https://design.cricut.com.I am assuming your Cricut is connected to your computer, but that you have not used the Design Space. First-time users will be prompted to download the Cricut Bridge software.
When you get into the Design Space, open up a New Project.
Once a new project canvas is opened, click Upload to upload your file.
The upload screen is pretty straightforward -- you can upload your own images to use for free, which is exactly what we're doing.
When you upload your image, you'll be presented with a few options. For simplicity's sake, choose "Complex" and hit Continue.
Unless you made a mistake when exporting your image, you don't need to mess with Select & Erase.
Hit Continue again.
On the last screen, you'll have options as to what kind of image you'll be using, and what you want to name it.
Since you uploaded something you want to make into stickers, save this as a Print then Cut image. Consider adding some tags, too, just to save yourself trouble.
Once you've got that all done, hit Save.
You'll be taken back to the upload screen, where you can insert your recently uploaded images.
Click on your desired sticker(s) to select it, and then click Insert Images.
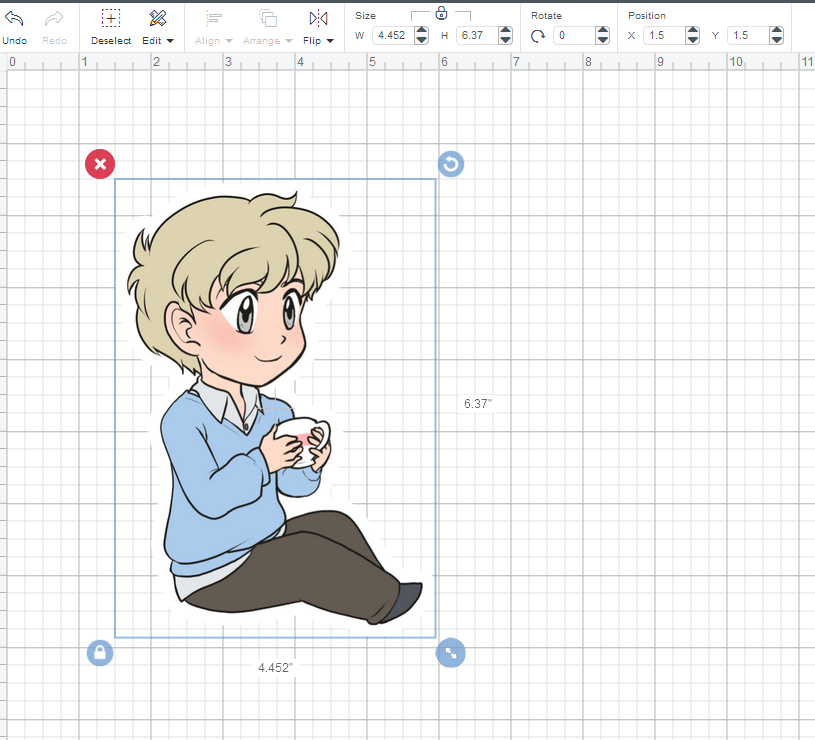
Here's why we needed to know the dimensions of the sticker before.
The Cricut Design Space doesn't recognize that you might have set a specific resolution for your image.
This is mildly annoying, but workable.
Select your image on the canvas, and change the size to match what you expected it to be. (Otherwise, you're going to have some monstrously large images.)
Resized, it looks MUCH better!
If you're adding other stickers, follow the same process to upload them. If you're going to do sheets of the same sticker, duplicate it.
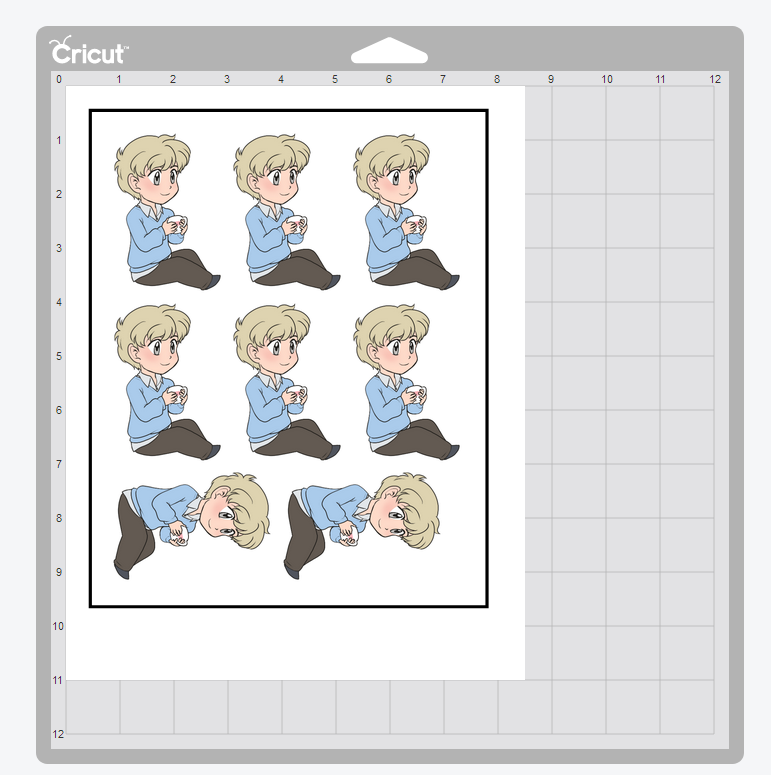
From past experience, I know I can fit about six 3inch stickers on a sheet of 8.5 x 11 sticker paper -- sometimes I can fit as many as 9.
When you click Make It, you'll get a preview of your print output so you can decide if you want to fit more images on the same sheet of paper. Cricut ONLY handles 8.5 x 11 Print then cut projects, for reference.
The Design Space will automatically adjust your images for the best fit with the paper you've given it.
If it all looks good, hit "Continue" and load your paper into the printer.
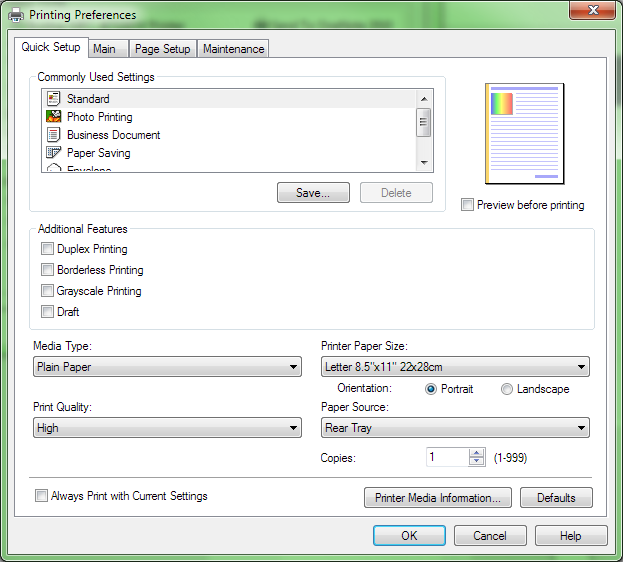
When you send your file to the printer, you can adjust your settings using 'Advanced' (I suggest doing this) -- here's my settings for my Pixma.
Unfortunately, you'll need to do this EVERY TIME YOU PRINT. (Unless you set it as a default setting, but... ugh.)
Applying your Laminate
DO NOT EXIT THE CRICUT DESIGN SPACE WHILE YOU'RE DOING THIS.Now that your images are printed, you'll need to apply the laminate. Notice how there's a black border around the space the images occupy -- this is the bounding box the Cricut uses to determine where to cut.
Figure out how wide and how tall that is -- you want your laminate to stay within these borders, but not overlap onto them.
Why? The Cricut scans these borders. If there's laminate on top of it, you may get an inaccurate cut due to the reflective nature of the material.
To keep it inside the borders, we'll cut a chunk of laminate approximately 7 inches wide by 8 3/4 inches tall.
Once I have my laminate cut, I start applying it by peeling a corner and placing it in a corner of my paper. Then, I very carefully peel, making sure to run my hand over the areas the laminate will now lay as I peel. This helps prevent bubbles. This video also goes over a similar process, burnishing while applying.
Once your laminate is applied, it's time to cut.
Finally.
Cutting Your Stickers
If you've not used your Standard Grip mat before… You might want to roll a t-shirt over it or something because the adhesive is likely to destroy your paper. Just de-stick the thing.Now that you're good to go, put your stickers in the top corner.
Yes thank you, I know my mat is wrecked. It still works.
Typically, I set my dial for these stickers to Poster Board or Poster Board+.
Why? Because it applies the amount of pressure I need for die cut stickers. I don't have any desire to do KISS cut designs, so die cut works for me.
Follow the instructions in design space and load your mat and blade. Hit the "Go" button on your machine and let it do the magic.
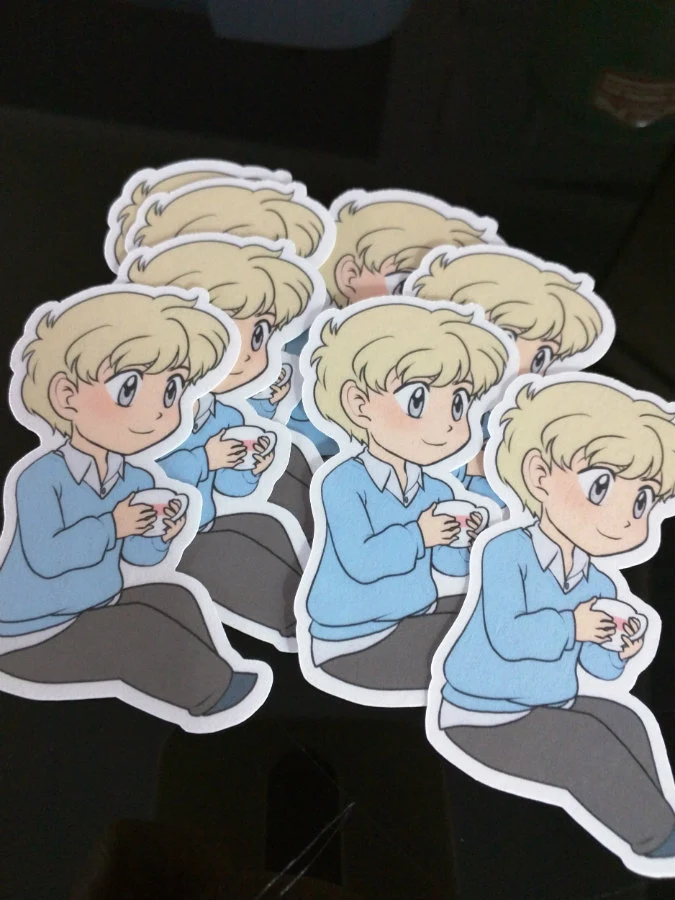
Once you're done, unload your mat, remove your stickers (use your spatula if you so choose) and you're done!
After all this, bear in mind that every so often, you may need to clean your Cricut blade with a bit of vinegar to remove any adhesive residue.
If you liked this tutorial, check out the resources I have over at shooting-stars.org!
If you liked my art, maybe check out my comic at linkedcomic.com?


Comments
Post a Comment