Preparing Traditional Inks for Digital Art
Love comics? Read mine now at 7inchkara.com
In our last installment of Intro to Comic Craft, we covered inking a comic page with fude pens. In today's tutorial, I'm going to go over dropping the bluelines for your inks, to prepare them for digital coloring.
Cleaning Up Your Scanned Lineart
Open Up Your File:
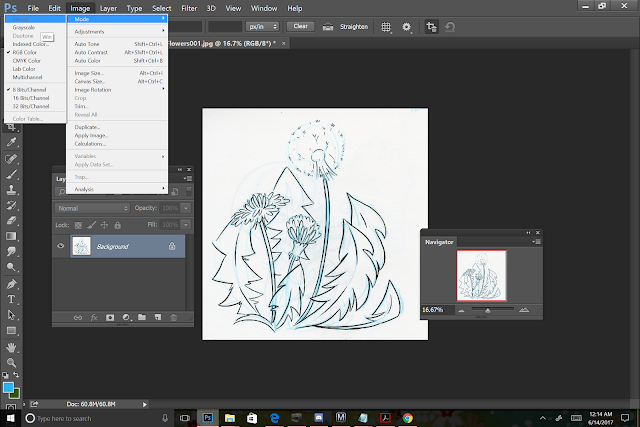
Convert your Lineart to Grayscale by going to Image-Mode-Grayscale
Agree to Discard your Color Information
Now you have a black, white and gray image. We want to drop that gray, leaving just the clean lineart.
Go to Image- Auto Adjust to drop some of those grays.
This tutorial was made possible thanks to the generosity of my Patrons on Patreon. To help keep the art education content coming, please consider joining the Artnerd community. Patronage begins at just $2 a month, and goodies include access to 7" Kara, Volume 1, backer exclusive tutorials and reviews, and early access to popular video topics.
To drop the rest of the grays, go to Image- Adjust-Curves
This will bring up a graph- the left side of the graph controls the whiteness of the paper, the right side controls the depth of your blacks. You want to drag a point down from the graph towards the left side, and a point up towards the right.
You can keep adjusting this until the black of your ink as a true black, the paper is a true white, and the grays have been dropped out of the image.
When working with traditional scans, I like to duplicate my original layer, turn that original layer off, and utilize that copy as my lineart.
Before adding color, make sure you change your color mode! For printing, you want to work in CMYK, for web, you want to work in RGB.
In the upcoming weeks, I'm going to cover digital flatting, shading, and other digital coloring techniques.


Comments
Post a Comment