Watercolor Basics: Color Correction
Last week, we talked about methods for stitching together a double page spread in Photoshop. Today we're discussing color correction.
Color correcting watercolors can be challenging. There are ways you can finagle your colors infinitely, or correct just one area, but I'm lazy. I'll show you guys a couple of my favorite methods, and encourage you to find your own!


Digital Color Correction
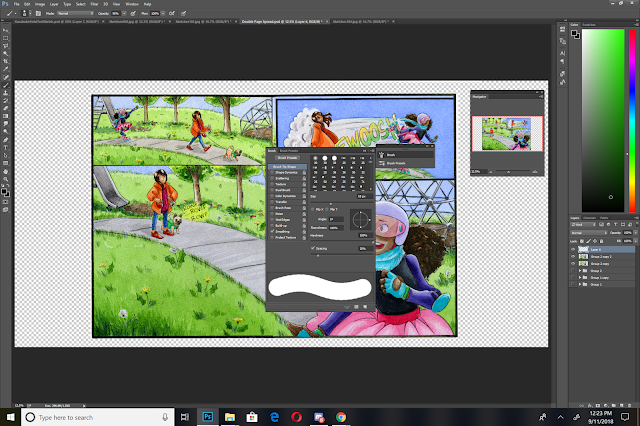
Starting with last week's file, I make a copy of my layer, turn off visibility on the previous layer, and use this new copy for corrections. I basically do this at every major stage- this makes it easy for me to just dump a bunch of changes that didn't work out. As always, I highly recommend you do not alter your originals.


Correction 1: Adjusting Hue/Saturation
My large format Epson scanner tends to scan things a little on the cool side, so I use Hue/Saturation to try and restore the original colors as much as possible.

Bumping it a little warmer messes with some of the more saturated colors- her hot pink tutu for example, and I always struggle with maintaining purples using this correction method.

If you'd like to color correct a specific area individually, you can copy that area to another layer and edit from there. For things like a hot pink tutus, or certain purples, this allows you to get a more accurate adjustment.

Correction 2: Multiply
I duplicate my adjusted layer

And set that duplicate layer to Multiply, then adjust the opacity until it looks right. My scanner has a tendency to wash my watercolors out, and this helps me regain some of that depth. Even a multiplied layer set to 10% opacity can make a big difference!


Correction 3: Retouching
I try to keep this correction to a minimum because it can quickly go from 'watercolor with a couple adjustments' to mixed media digital.
In this instance, I'm going to use a digital color pencils brush to reestablish the lines in the sidewalk.


Fixing the Borders:


I use a round brush to retouch my borders, color picking from my black border, creating a new layer, setting that layer to multiply, and then redrawing the border. This can be toggled so it better blends with the existing border.
Cropping
Sometimes I crop before color correction, sometimes I crop after, the only real difference it makes are size considerations.


This part is always one of the most frustrating steps for me- for some reason, I'm always catawampus! If I'm careful to align my scan (and I always am for important pieces), things still seem skewed. Photoshop has tools to help correct that, but often the corrections I need are micro corrections- small adjustments that would make a huge difference, and my happy medium always seems stuck between two of Photoshop's preferred points. So if you've ever noticed that my comic pages are always a bit skewy, now you know why!
Taking a Step Back:

The Finished Illustration

Color correcting watercolors can be challenging. There are ways you can finagle your colors infinitely, or correct just one area, but I'm lazy. I'll show you guys a couple of my favorite methods, and encourage you to find your own!

Uncorrected original

Stitched and Corrected Digital File
Digital Color Correction
Starting with last week's file, I make a copy of my layer, turn off visibility on the previous layer, and use this new copy for corrections. I basically do this at every major stage- this makes it easy for me to just dump a bunch of changes that didn't work out. As always, I highly recommend you do not alter your originals.


Correction 1: Adjusting Hue/Saturation
My large format Epson scanner tends to scan things a little on the cool side, so I use Hue/Saturation to try and restore the original colors as much as possible.

Bumping it a little warmer messes with some of the more saturated colors- her hot pink tutu for example, and I always struggle with maintaining purples using this correction method.

If you'd like to color correct a specific area individually, you can copy that area to another layer and edit from there. For things like a hot pink tutus, or certain purples, this allows you to get a more accurate adjustment.

Correction 2: Multiply
I duplicate my adjusted layer

And set that duplicate layer to Multiply, then adjust the opacity until it looks right. My scanner has a tendency to wash my watercolors out, and this helps me regain some of that depth. Even a multiplied layer set to 10% opacity can make a big difference!


Correction 3: Retouching
I try to keep this correction to a minimum because it can quickly go from 'watercolor with a couple adjustments' to mixed media digital.
In this instance, I'm going to use a digital color pencils brush to reestablish the lines in the sidewalk.


Fixing the Borders:


I use a round brush to retouch my borders, color picking from my black border, creating a new layer, setting that layer to multiply, and then redrawing the border. This can be toggled so it better blends with the existing border.
Cropping
Sometimes I crop before color correction, sometimes I crop after, the only real difference it makes are size considerations.


This part is always one of the most frustrating steps for me- for some reason, I'm always catawampus! If I'm careful to align my scan (and I always am for important pieces), things still seem skewed. Photoshop has tools to help correct that, but often the corrections I need are micro corrections- small adjustments that would make a huge difference, and my happy medium always seems stuck between two of Photoshop's preferred points. So if you've ever noticed that my comic pages are always a bit skewy, now you know why!
Taking a Step Back:

I ended up making some final revisions to fix the sidewalk and the grass, but I covered the basics for that in a prior post.
The Finished Illustration


Comments
Post a Comment