Toning Pages and Panels: Watercolor Basics
Today we're taking a look at one of my most used watercolor techniques- washes and tones! I prep every single 7" Kara page with either panel specific washes and tones, or page unifying all over washes or tones. Tones are one of the first steps taken on every page and give me an opportunity to influence the color for the entire page, or just a single panel.
This post is part of my Watercolor Basics Series!

This series of tutorials and reviews spans this blog as well as my Youtube Channel.

My Watercolor Basics course is designed to get you guys painting! I start at the very beginning (papers, paints, and brushes) and walk you through every step. Video tutorials help demonstrate techniques in real time, and timelapses provide inspiration and motivation to keep you painting.
All this is based on my experience painting 7" Kara, my watercolor webcomic!

7" Kara is a charming all ages watercolor comic that follows the adventures of diminutive Kara as she explores the outside world and makes some huge friendships. 7" Kara updates with a new page every Friday!
Speaking of 7" Kara, every single page of 7" Kara sees either an all over wash of color, or individual panel washes.
Toning Your Pages and Toning Your Panels:
Toning is simply watercolor washes, or glazes, and may include:
Flat washes
Graduated washes
Wet into wet techniques
Glazing
Reasons to tone:
Set mood in individual panel
Set overall mood on page/scene
Establish Shadows and Underglazes that might not otherwise be possible or feasible


Flat Washes:
The workhorse of page and panel toning.
Basic Flat Wash:
Exampls:


Graduated Washes:
Single Color:
Graduated Wash (Two Ways) Tutorial:
Examples:


Multiple Color:
Multi Color Graduated Wash Tutorial:
Examples:


Variations on Graduated Washes:
Sky:
Watercolor Sky Tutorial:
Sunset:
Painting A Sunset- Watercolor Tutorial:
Examples:


Lifting Color Mini Demonstration
Quick Wet into Wet Watercolor Techniques

When applying a mask, I've found I have the best results when I use a synthetic brush that's been thorougly coated with brush soap. If you don't have brush soap handy, handsoap will work- you basically want to prevent the masking fluid from permeating the bristles. In natural hair brushes, masking fluid can ruin a good brush, so either use a ratty old brush, or a brush that's cheap enough that you don't feel bad tossing and replacing it should it get ruined.
You can also use masking fluid to create random speckles of white. Prepare your brush as above, dip into your masking fluid, then gently tap your brush.

Some masking fluids have a colorant added to make them visible, but I've had issues with them staining the paper, so I prefer my masking fluid untinted.
Lifting a Too Dark Wash:

While watercolor is still wet, gently apply a paper towel or clean rag to the area you want to lift. If you'd like to add a texture, you can use a textured paper towel, terry cloth towel, or a sponge. Apply firm pressure, then remove.

Toning and Underglazing in a Single Panel:
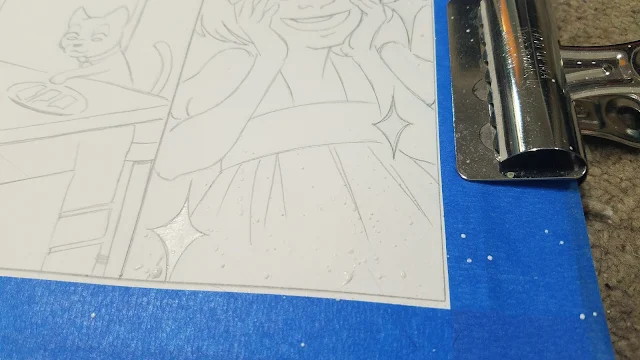
In this panel, I really wanted to push a sparkly, shoujo effect to demonstrate Kara's delight. Areas I wanted to reserve have already been masked off with masking fluid, and the initial layer of tone has already been applied.

I block in the shadows using the same color I initially toned with.

Once dry, I go in again, darker some shadows a bit more (like beneath the neck) and darken the background).

Once that has dried, I decide to paint the background in masstone SoHo Permanent Mauve, so the difference between toning and background is more pronounced.

Finished panel.
I hope you found this overview of washes and toning pages and panels to be helpful and informative. If you enjoyed this post, please check out my other posts in my Watercolor Basics series, and please spread the word! If you ever have any questions, or need to see something demonstrated in depth, don't hesitate to email or Tweet me.
Posts like this are only made possible through the generosity of my Artnerds on Patreon.

Artnerds see early access videos, weekly Newsletters, and backer exclusives like free comics and art assets. Their financial support enables me to purchase supplies for review, and their emotional support enables me to devote the time necessary to maintaining this blog and providing art educational resources free of charge. Their help is hugely invaluable, and I would love it if you considered joining their ranks.
This post is part of my Watercolor Basics Series!

This series of tutorials and reviews spans this blog as well as my Youtube Channel.

All this is based on my experience painting 7" Kara, my watercolor webcomic!

7" Kara is a charming all ages watercolor comic that follows the adventures of diminutive Kara as she explores the outside world and makes some huge friendships. 7" Kara updates with a new page every Friday!
Speaking of 7" Kara, every single page of 7" Kara sees either an all over wash of color, or individual panel washes.
Toning Your Pages and Toning Your Panels:
Toning is simply watercolor washes, or glazes, and may include:
Flat washes
Graduated washes
Wet into wet techniques
Glazing
Reasons to tone:
Set mood in individual panel
Set overall mood on page/scene
Establish Shadows and Underglazes that might not otherwise be possible or feasible

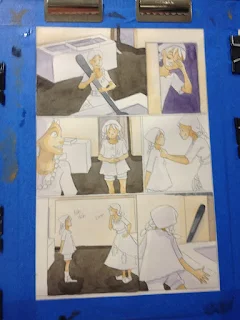
A bright, warm yellow underglaze helps establish this scene as 'morning'

Single panel toning doesn't reflect the background, but does reflect the mood- such as the warm pink panel on the lefthand side, or the aura around the handshake on the left.


This spread has blue green undertones (most noticable on Kara, bottom left hand corner) that wouldn't be feasible as a glaze once the yellow was completed.
Entire Page Washes Vs Individual Panel Washes


Left: Entire Page Toning to Set Scene Right: Individual Panel Toning to Set Mood
Entire page washes unify the entire page, and can be useful if you're working with a gamut of disparate colors.
Individual Panel washes can help establish environment, help with intense mood lighting and shadow, or help convey a specific emotion that may differ from the rest of the page.
Although the effect may seem overwhelming at the beginning, as the page comes together, it will start to make visual and narrative sense.
Toning Panels Demonstration:
Developement of Pages
These are selected pages from Chapter 7. Each photo was taken at the end of the day, or at the end of a specific stage.


Panel Specific Washes:


As you can see, as the panels develop, the initial tone ceases to be distracting, but still influences the overall panel.


Once the pages are complete, the tones are almost indistinguishable but add a subtle color shift to individual panels.
Panel Specific Undertoning:


In this instance, early underglazes were used to help establish shadow that would influence later colors. This could not be applied as a glaze on top, because it would reactivate prior layers and cause muddiness.
Entire Page Washes:


In this instance, a combination of entire page washes and single color undertones help unite all the panels on this page, and help convey a feeling of very early morning.
Useful techniques washes and toning:
The workhorse of page and panel toning.
Basic Flat Wash:
Exampls:


Graduated Washes:
Single Color:
Graduated Wash (Two Ways) Tutorial:
Examples:


Multiple Color:
Multi Color Graduated Wash Tutorial:
Examples:


Variations on Graduated Washes:
Sky:
Watercolor Sky Tutorial:
Sunset:
Painting A Sunset- Watercolor Tutorial:
Examples:


Lifting Color Mini Demonstration
Quick Wet into Wet Watercolor Techniques
Applying a Mask:
Materials Used:
- Winsor and Newton Masking Fluid
- Synthetic Brush
- Cup Clean Water
- Old Masters Brush Soap
- Masking Fluid Pick Up

When applying a mask, I've found I have the best results when I use a synthetic brush that's been thorougly coated with brush soap. If you don't have brush soap handy, handsoap will work- you basically want to prevent the masking fluid from permeating the bristles. In natural hair brushes, masking fluid can ruin a good brush, so either use a ratty old brush, or a brush that's cheap enough that you don't feel bad tossing and replacing it should it get ruined.

You can also use masking fluid to create random speckles of white. Prepare your brush as above, dip into your masking fluid, then gently tap your brush.

Some masking fluids have a colorant added to make them visible, but I've had issues with them staining the paper, so I prefer my masking fluid untinted.
Lifting a Too Dark Wash:
This technique is used to lift out Clouds in the Sky tutorial:

While watercolor is still wet, gently apply a paper towel or clean rag to the area you want to lift. If you'd like to add a texture, you can use a textured paper towel, terry cloth towel, or a sponge. Apply firm pressure, then remove.

Toning and Underglazing in a Single Panel:
In this panel, I really wanted to push a sparkly, shoujo effect to demonstrate Kara's delight. Areas I wanted to reserve have already been masked off with masking fluid, and the initial layer of tone has already been applied.

I block in the shadows using the same color I initially toned with.

Once dry, I go in again, darker some shadows a bit more (like beneath the neck) and darken the background).

Once that has dried, I decide to paint the background in masstone SoHo Permanent Mauve, so the difference between toning and background is more pronounced.

I hope you found this overview of washes and toning pages and panels to be helpful and informative. If you enjoyed this post, please check out my other posts in my Watercolor Basics series, and please spread the word! If you ever have any questions, or need to see something demonstrated in depth, don't hesitate to email or Tweet me.
Posts like this are only made possible through the generosity of my Artnerds on Patreon.

Artnerds see early access videos, weekly Newsletters, and backer exclusives like free comics and art assets. Their financial support enables me to purchase supplies for review, and their emotional support enables me to devote the time necessary to maintaining this blog and providing art educational resources free of charge. Their help is hugely invaluable, and I would love it if you considered joining their ranks.


Comments
Post a Comment