Intro to Comic Craft: Step by Step: Introduction to Roughs
As part of this series, my Patrons have exclusive access to behind the scenes comic creation content, including the entire plotform synopsis for 7" Kara, the 7" Kara beat sheet, the Chapter 7 Synopsis, the Chapter 7 tight script, and loads more. If you learn best from working example, joining my Patreon will give you access to those files.
You can join Kara on her adventures by ordering a copy of Volume 1 from my shop, or reading the webcomic on Tumblr or on the site.
In this installment of Intro to Comic Craft, it's gonna get rough. Real rough.
What are roughs
Roughs are the stage between thumbnails and pencils- when most of the acting and stage direction have been determined, but not necessarily all expressions or environments. Roughs are an opportunity to tighten up acting, facial expressions, costumes, and your scenery- think of roughs as you would the rehearsals for a play. Perhaps the best actors can ad lib a performance, but if you're unsure of your work, why not give roughs a shot?
Why not go from thumbnails to pencils?
If your work is very cartoony, or your thumbnails very tight, or you tend to work clean, you can definitely go straight from thumbnails to pencils. Success in completing comic pages is about finding a process that works for you. If you have time restrictions, going from tight thumbnails to loose pencils is a great way to save yourself a step. In our last post, I showed you how to convert your thumbnail drawings into the building blocks of your roughs- the bluelines. In the next few posts, we're going to focus on key elements that you'll need to master in order to make your roughs useful.
- Body Language
- Facial Expressions
- Backgrounds
In our thumbnails, we introduced the beginnings of all three elements, with the focus being on body language. In our roughs, we're going to work to refine all three elements, and make sure they read clearly to our audience.
As part of the Intro to Comic Craft: Step by Step series, I am going to focus on each step, one at a time, to explain my process in hopes that it inspires yours. But first, I want to give you a very brief introduction to how I use roughs, and provide some examples.
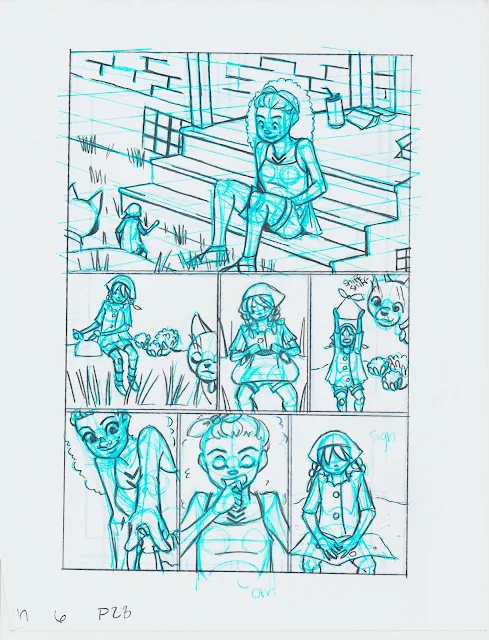
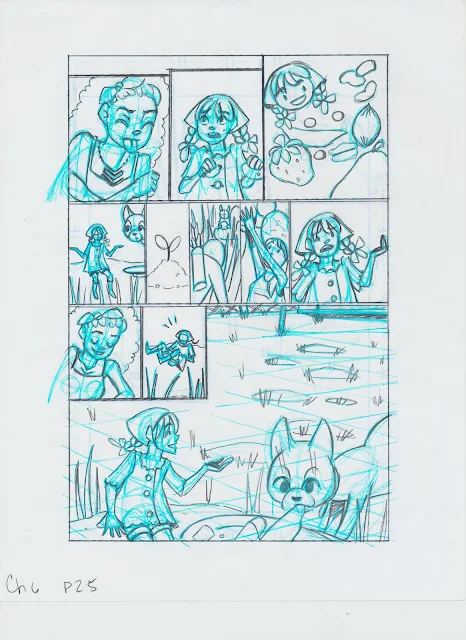
Examples from 7" Kara, Chapter 6
Thumbnails:
My thumbnails are comparatively tight, but they're still too lose for me to go straight to pencils. Everything is approximate, meant to be a placeholder to remind a forgetful artist (me!) of body language, expressions, environment, and camera direction.
Roughs:
My roughs are tighter than my thumbnails in that I figure out environments, perspective, specific body language, and camera angles.
At this stage, I haul out the large ruler, the scrap paper, and the blue tape to lay down some perspective grids. This is also my opportunity to bust out the constructive anatomy, and make sure my pages not only read well, but look good.
When I've finished a chapter's worth of roughs, I scan them and send them on to friends for editing. My roughs may see a couple passes before I move on to pencils.
Pencils:
Unfortunately, I have no examples to show you, but while my roughs may be effective but ugly, my pencils are an opportunity to really clean things up and refine details.
For my pencils, I print my roughs out as bluelines onto Canson Montval watercolor paper (mentioned frequently in my Watercolor Basics series) using a waterbased printer (a Canon Pixma Pro 9000 Mk II, an inkjet printer capable of handling art papers and large formats. I go over these lines with a H or HB pencil (anything softer will smear when I stretch the paper).
This stage is far too late for any major revisions, but it's perfect for correcting issues in facial expressions, tightening up clothing details, or adding a little more detail to the background.
Painted Pages:
Art-wise, very little changes between roughs and the painted page, other than refinement. Roughs really are my best opportunity to clean things up and make sure things look right.
If you guys have any questions about this stage of comic production, don't hesitate to shoot me an email using the form on the left hand side of the blog! And if you'd like to see a particular topic covered in depth, that isn't covered here or on the Youtube channel, let me know!
Recommended Videos:
This installment of the Intro to Comic Craft: Step By Step series was sponsored by the launch of 7" Kara as a webcomic!
If you enjoy my art and this blog, you'll definitely enjoy 7" Kara! Chapter 1 is available in completion, and Chapter 2 just started. Updates are every Friday on the Tumblr or on the site.


Comments
Post a Comment