Watercolor Basics: Step by Step: Adding Details
Now that we've introduced the basics of Watercolor Basics, it's time to take you step by step through some of the most common processes for completing a watercolor illustration. I'm going to take you from start to finish through my 2016 Christmas card illustration, explaining my techniques as I go. I have a series of video tutorials recorded concurrently that should be available on my Youtube channel soon, if you need some live action explanation.

If you enjoy this series, if you have learned something, or if I have inspired you in some way, please take a moment to share this, or any post, with your friends and familiy on your favorite social networking platform. There are handy sharing buttons below this post. If you enjoy art education content, and would like to be part of the process, please visit my Patreon for information on how to join the artnerd community. Backers get early access to popular series, backer exclusive content, and voting rights on upcoming content.
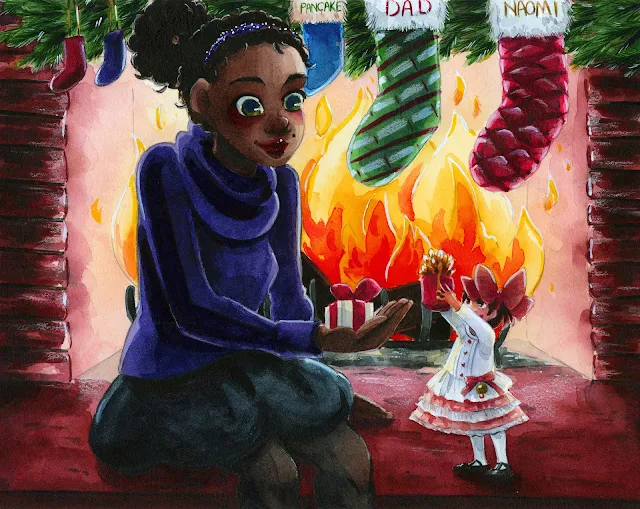
When we've finished these tutorials, this is what the finished illustration will look like! This image was designed and used for my Christmas 2016 cards sent out to friends, family, and Patrons.
This image features Naomi and Kara from my children's watercolor comic, 7" Kara. If you enjoy this blog, and enjoy my art, I highly recommend you order a copy through my shop!
Previously, we went over how to add shadows and shading to your watercolor illustration (link).
Today we're going over how to add final details with watercolor pencils, opaque watercolor, and gouache.
Materials Used in this Tutorial:
Watercolors of your choice (I use Winsor and Newton moist half pans, Daniel Smith, SoHo, and Holbein watercolors)
Daisy watercolor wells or palette of choice- Continue with the colors you have mixed
Watercolor brushes (I use mainly rounds)
2 watercolor cups- 1 clean, 1 dirty- I like the Faber-Castell collapsible cups
Paper towels
Watercolor Pencils (Derwent Inktense)
White Gouache
Grumbacher Opaque Watercolors
Paper used:
Canson Moulin du Roy
Watercolor Brushes Used in this Tutorial:
Step 1: Refining with White Watercolor Pencil


Step 2: Blend some areas out with water if white is too harsh

Step 3: Refine and add small details with the watercolor pencils.

Inktense pencils are some of my favorite water-based pencils. Although they are indelible after water has been added, they are some of the most saturated water-based pencils I've encountered. They blend out with water quite nicely, and can be used both wet and dry.


 At this point, I decided that I wanted to remove some of the pencil lines from the fire, so I pulled out my Grumbacher opaque watercolors and activated the light yellow in the bottom right.


Step 4: Add Details with White Gouache

Step 5: Use white Gouache to add outline on objects nearest fire to give the impression of reflected light
 Step 6: Use Gouche to add stronger white outline to stockings, along fur of stockings, in the garland nearest the fire

Step 7: Use Gouache to add white highlights to eyes, hair, rhinestones

Step 8: Refine white details with watercolor pencils for a cleaner look.

Step 9: Sparingly use opaque watercolors or colored gouache for toned corrections
(like covering some of the pencil marks in the fire)


Our Sponsor

For more beautiful watercolor work, why not pick up a copy of 7" Kara, Volume 1? 7" Kara is a lush watercolor comic the entire family can enjoy, following the adventures of tiny Kara as she discovers humans, explores the backyard, and befriends a kitten. Created by Becca Hillburn, if you enjoy this blog and my art, you'll love 7" Kara. Volume 1 is available in the Natto-shop.

If you enjoy this series, if you have learned something, or if I have inspired you in some way, please take a moment to share this, or any post, with your friends and familiy on your favorite social networking platform. There are handy sharing buttons below this post. If you enjoy art education content, and would like to be part of the process, please visit my Patreon for information on how to join the artnerd community. Backers get early access to popular series, backer exclusive content, and voting rights on upcoming content.

When we've finished these tutorials, this is what the finished illustration will look like! This image was designed and used for my Christmas 2016 cards sent out to friends, family, and Patrons.
This image features Naomi and Kara from my children's watercolor comic, 7" Kara. If you enjoy this blog, and enjoy my art, I highly recommend you order a copy through my shop!
Previously, we went over how to add shadows and shading to your watercolor illustration (link).
Today we're going over how to add final details with watercolor pencils, opaque watercolor, and gouache.
Materials Used in this Tutorial:
Watercolors of your choice (I use Winsor and Newton moist half pans, Daniel Smith, SoHo, and Holbein watercolors)
Daisy watercolor wells or palette of choice- Continue with the colors you have mixed
Watercolor brushes (I use mainly rounds)
2 watercolor cups- 1 clean, 1 dirty- I like the Faber-Castell collapsible cups
Paper towels
Watercolor Pencils (Derwent Inktense)
White Gouache
Grumbacher Opaque Watercolors
Paper used:
Canson Moulin du Roy
Watercolor Brushes Used in this Tutorial:
- For rounds larger than 6, I use synthetic brushes. Your preferences may vary from mine- I have several brands, and still have not found a brand I think perform as well as natural hair brushes. Synthetic brushes are much cheaper than natural hair brushes, especially at larger sizes, and are useful for blocking in color, as we will be doing in this tutorial.
- Creative Mark Rhapsody Kolinsky Sable Brushes- 4, 2, 1, 0
- Creative Mark Squirrel Brushes- 4, 6
- Blick Master Studio Squirrel- 4, 6
Step 1: Refining with White Watercolor Pencil


Step 4: Add Details with White Gouache


Step 9: Sparingly use opaque watercolors or colored gouache for toned corrections
(like covering some of the pencil marks in the fire)


Allow illustration to dry completely before removing watercolor tape. When peeling off watercolor tape, pull away from the board at a 90 degree angle to reduce tearing.
Our finished and scanned piece, corrected digitally for color accuracy:

Our Sponsor


Comments
Post a Comment