Watercolor Basics: Step By Step: Washes
Now that we've introduced the basics of Watercolor Basics, it's time to take you step by step through some of the most common processes for completing a watercolor illustration. I'm going to take you from start to finish through my 2016 Christmas card illustration, explaining my techniques as I go. I have a series of video tutorials recorded concurrently that should be available on my Youtube channel soon, if you need some live action explanation.

If you enjoy this series, if you have learned something, or if I have inspired you in some way, please take a moment to share this, or any post, with your friends and familiy on your favorite social networking platform. There are handy sharing buttons below this post. If you enjoy art education content, and would like to be part of the process, please visit my Patreon for information on how to join the artnerd community. Backers get early access to popular series, backer exclusive content, and voting rights on upcoming content.

When we've finished these tutorials, this is what the finished illustration will look like! This image was designed and used for my Christmas 2016 cards sent out to friends, family, and Patrons.
This image features Naomi and Kara from my children's watercolor comic, 7" Kara. If you enjoy this blog, and enjoy my art, I highly recommend you order a copy through my shop!
Previously: I showed you how to stretch watercolor paper (link)
In this post, I'm going to take you through the first step in almost any watercolor illustration I complete- applying washes. With some images, I need to apply multiple washes, or each panel may require a unique wash. Some illustrations require gradiated washes, or for Brusho to be applied while a wash is still wet. Those washes will be covered at a later date.
Materials Needed for this Tutorial:
1 cup clean water
1 mop brush (you could also use a hake brush if you wish)
1 small cup for your wash-I recycle the yogurt cups from my Blue Apron subscription
Watercolors of choice (I use a mixture of Winsor and Newton moist half pans, Daniel Smith tube watercolors, SoHo watercolors, and Holbein watercolors)
Paper towels (I use Viva)
Watercolor brushes
Pipette
Watercolor Brushes I use in this tutorial:
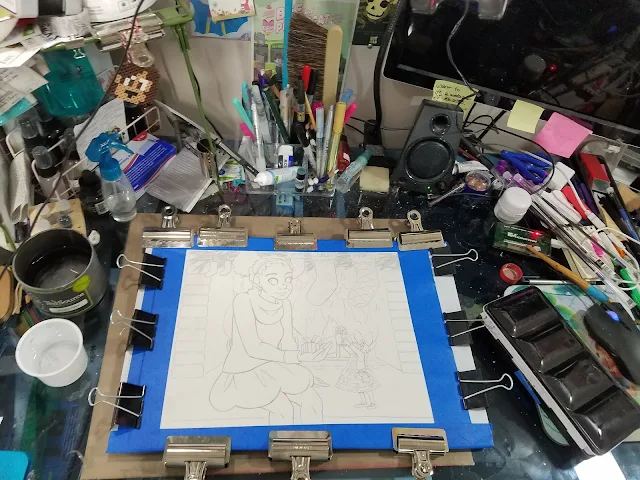
Step 1: Assemble your materials
Step 2: Activate your watercolors
With semi moist half pans, this is done by dropping a drop of water into each pan using your pipette.
Step 3: Add your watercolor to your wash cup
I recommend starting very light- this is a wash afterall. For this illustration, we're going to do an all over tonal wash of warm yellow to simulate firelight, so we'll mix Indian Yellow into our white wash cup shown in the photo above.
Step 4: Apply Wash
Working with your illustration slightly elevated, begin at the top and work your way down with a wet watercolor mop. Once the entire surface has been evenly covered with water, you can soak up excess water using a 'thirsty' brush or by gently dabbing a paper towel into the pooled water.

For A Soft Glow
Working wet into wet, add more color in the area you wish to glow- in this case, the fire.

Step 5: Allow to dry thoroughly, still elevated

If you are rendering a comic page that requires multiple washes, or very different colors in each panel, please allow each wash to dry before applying the next.
Our Sponsor
 For more beautiful watercolor work, why not pick up a copy of 7" Kara, Volume 1? 7" Kara is a lush watercolor comic the entire family can enjoy, following the adventures of tiny Kara as she discovers humans, explores the backyard, and befriends a kitten. Created by Becca Hillburn, if you enjoy this blog and my art, you'll love 7" Kara. Volume 1 is available in the Natto-shop.

If you enjoy this series, if you have learned something, or if I have inspired you in some way, please take a moment to share this, or any post, with your friends and familiy on your favorite social networking platform. There are handy sharing buttons below this post. If you enjoy art education content, and would like to be part of the process, please visit my Patreon for information on how to join the artnerd community. Backers get early access to popular series, backer exclusive content, and voting rights on upcoming content.

When we've finished these tutorials, this is what the finished illustration will look like! This image was designed and used for my Christmas 2016 cards sent out to friends, family, and Patrons.
This image features Naomi and Kara from my children's watercolor comic, 7" Kara. If you enjoy this blog, and enjoy my art, I highly recommend you order a copy through my shop!
Previously: I showed you how to stretch watercolor paper (link)
In this post, I'm going to take you through the first step in almost any watercolor illustration I complete- applying washes. With some images, I need to apply multiple washes, or each panel may require a unique wash. Some illustrations require gradiated washes, or for Brusho to be applied while a wash is still wet. Those washes will be covered at a later date.
Materials Needed for this Tutorial:
1 cup clean water
1 mop brush (you could also use a hake brush if you wish)
1 small cup for your wash-I recycle the yogurt cups from my Blue Apron subscription
Watercolors of choice (I use a mixture of Winsor and Newton moist half pans, Daniel Smith tube watercolors, SoHo watercolors, and Holbein watercolors)
Paper towels (I use Viva)
Watercolor brushes
Pipette
Watercolor Brushes I use in this tutorial:
- For anything larger than a 6 round, I use synthetic. Synthetics at larger sizes are much more affordable than natural hair brushes, although they do not perform as well, and tend to be too stiff.
- I use this Cotman mop to lay down washes. It's an affordable synthetic that performs quite well.
Step 1: Assemble your materials

With semi moist half pans, this is done by dropping a drop of water into each pan using your pipette.
Step 3: Add your watercolor to your wash cup
I recommend starting very light- this is a wash afterall. For this illustration, we're going to do an all over tonal wash of warm yellow to simulate firelight, so we'll mix Indian Yellow into our white wash cup shown in the photo above.
Step 4: Apply Wash
Working with your illustration slightly elevated, begin at the top and work your way down with a wet watercolor mop. Once the entire surface has been evenly covered with water, you can soak up excess water using a 'thirsty' brush or by gently dabbing a paper towel into the pooled water.

For A Soft Glow
Working wet into wet, add more color in the area you wish to glow- in this case, the fire.

Step 5: Allow to dry thoroughly, still elevated

If you are rendering a comic page that requires multiple washes, or very different colors in each panel, please allow each wash to dry before applying the next.
Our Sponsor

Comments
Post a Comment