Using Distress's Picket Fence Opaque White Marker for Details
I am always on the lookout for a grail opaque white pen. Ideally I want a brush, I want variable opacity, I want to be able to rework it. Years ago, I was tipped off that Posca makes a brush similar to this, and I did use the Posca white brush pen for awhile (especially to add white highlights on the comic Momotaro), but I wasn't entirely satisfied with it or its results.
When researching Tim Holtz Distress markers for my review , I found out about the unique white pigment brush pen in the Distress markers line. Picket Fence is a twin tipped opaque white pigment brushpen that seemed designed for adding white details, and if it worked as promised, seemed like an idea solution for many illustrators looking for subtle whites. I've covered my basic thoughts on Distress markers in general, and Picket Fence specifically in my Distress markers review, and I've already covered in Copic Tutorial- Skin Basics, Freckles, Hair, Clothes the basics of coloring Kara's skin in the illustration used for this tutorial, so if you're looking for basic Copic tips, I recommend you check that out first. This is a specialized tutorial that focuses on using Tim Holtz Distress marker in Picket Fence (an opaque white) to add white details over Copic marker or watercolor.
 |
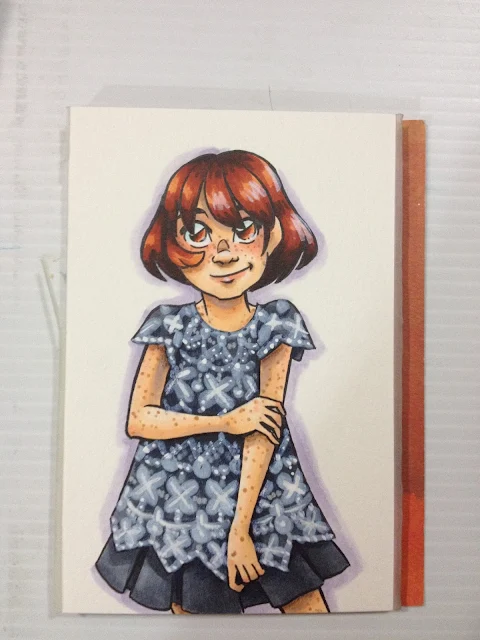
| The finished illustration |
You can get your own Picket Fence scrapbooking stores that carry Ranger products, at many Michael's, or through my Amazon affiliates link.
I'm starting this tutorial with markered illustration I created for the purposes of this tutorial. Kara is wearing a dark, plain gray dress, because I thought the white would really stand out against it.
Although I haven't used my Picket Fence very much, it's already showing a fair amount of wear and tear on the tip of the brush, which makes delicate or finicky applications difficult.
First Application of Picket Fence
Picket Fence applies clear and dries to a white, so that combined with my broken in brush nib made it difficult to draw in a complicated design. I opted to keep it fairly simple- I edged the sleeves and bottom of the lace, and focused on drawing triangles and trefoils in this initial layer. I used the larger brush nib so I could cover ground quickly.
For the second application of Picket Fence, intended to build up opacity, I tried to use the smaller fiber nib to draw in tiny details. Unfortunately the stiffness of this nib tends to scrape away prior layers of Picket Fence, rather than depositing more pigment.
It's a bit difficult to do intricate designs like lace, because the Picket Fence Opaque White goes on clear and dries to white. The smaller nib is almost useless, as it's very scratchy and wanted to tear up the completely dry paper I tested it on. You can't layer Picketfence for more opaque whites- repeated application just wipes away your initial application. Also, my Picket Fence's brush nib is fraying pretty badly.
Using Copic Opaque White for Additional Details
Since Picket Fence had done all it was going to do for my illustration, I fished out my Copic Opaque White. This is a bottle with the tiny little applicator brush, which I absolutely hate using, as it doesn't deposit the Opaque White where you want it to go, so I pulled out some fine synthetic brushes.
Accents of Copic White really do a lot to help push a lacy look with the Picket Fence. (Secret: I hate the fine applicator on my Copic Opaque, and I just use a regular synthetic round instead), and I'm going to let that dry completely before I go in with the white color pencil, and add some shading with an Indigo Blue color pencil.
Using White Color Pencil for Further Details
I wasn't done adding in detail though! I fished out my Caran d'Ache Pablo's titanium white to add in even more fine details.
White color pencil does not want to go over Picket Fence, so I used it to add a few more details. My Blue Indigo color pencil DID go over Picket Fence (as well as Opaque White), so I used that to add a little shading both beneath the lace and on top of the lace where Kara's arms would cast a shadow.
Using Indigo Color Pencil to Sketch in Shadows
My lace still doesn't really look like lace sitting on TOP of the dress, so I decided to use an Indigo color pencil to add some shadows beneath the applied white.
Last I used a little more Picket Fence to add white highlights to Kara's hair, eyes, nose, and lips.
Using Picket Fence With Copics and Watercolor for Highlights
You can also use your Picket Fence in conjuction with watercolors, and even brush away some of the pigment for a better transition between opaque white and your original illustration.
Colored pencil was applied first, then Picket Fence was applied on top. Picket Fence was softened by using a clean wet brush to brush away some of the opaque white and better blend the transition of applied white.
Picket Fence is an interesting opaque white solution that isn't suitable for corrections, but geared towards accents. It does leave a slightly shiny residue, so if you're looking for a more subdued opaque white application, you may prefer Winsor Newton Pigment Marker's Opaque White.
If you're looking for other interesting opaque white products, you should check out my upcoming post about toning techniques in a Strathmore Toned Tan drawing book- I use Winsor and Newton's brand new opaque white blender with Copics and color pencils for toned sketches that pop!


Comments
Post a Comment